Thursday, August 31, 2017

The eAt Equation


It is time for more "Chemistry of Life" posts! My last one was a long time ago, in March. I have done a bit of thinking, and have finally created one equation that explains a phenomenon of how time goes by slowly when you feel bored. This is more of a physics/math post, though, not chemistry, but all branches of science are connected, aren't they?
But wait! Before we get there, I want you to think of the most famous equation on the planet. The one everyone knows by heart, even if they don't know what it means.
Hint: It's not 1+1=2.
Hint: It's not the Pythagorean Theorum
Hint: It's not Bart Simpson. Focus, people, focus!

File:Facepalm-Homer-Simpson.jpg
Credit

Okay, I'll just give it to you. It's E=mc². It shows that energy and mass can be changed into one another and are proportional.
Now, allow me to introduce the most famous equation for the Chemistry of Life that other scientists  and I use. It is:
e=A/t
Behold the eAt formula. E stands for your happiness factor, A stands for the actual time that passes, and t stands for the time you think has passed. In other words:
A=te
The time that actually passes by equals the product of your happiness factor and how much time you think has passed by. This means that if your happiness factor is high and you're having fun, your perception of time will change, and you will think less time has passed than in real life.
Let me explain in an example:
Say Rachel leaves a party thinking she only spent an hour there, but she actually spent three hours. That means her happiness factor would by 3 hours/1 hour, or 3.
I know this is a bit confusing, especially because I haven't explained what a happiness factor is yet. It's basically just a number that shows how much fun you're having or how happy you are relative to another happiness factor. If Rachel's factor had been 2 instead of three, it would have meant she had not enjoyed the party as much, and she would have thought she had spent more than an hour at the party (assuming it lasts for the same amount of time as the original one).
Just to be clear, let me explain once more, with more of a visual aspect.
With a high energy factor:
A=Et
The factor is great, so the perceived time is small.
With a low energy factor:
A=eT
The factor is less, so the perceived time goes up to maintain the actual time.

Now, what does it all have to do with Einstein's E=mc²? Basically, it shows that your perceived time is related to the actual time that has passed with your energy factor, just like how energy is related to mass in Einstein's equation. However, Einstein's equation has a constant, whereas the eAt formula does not. Everything's a variable in this science.

I hope this wasn't too lengthy. :) Next time you're having fun, use this simple equation to determine your energy factor. How happy are you compared to your next party/fun time?
Do you want more chemistry of life posts? Tell me below!

Monday, August 28, 2017

How I Gift Books To Friends


I love giving out personal gifts to my friends, and I've realized that giving out books is a nice way to go. You can choose the perfect book for someone to cherish, and give some sort of book-related item to go along with it (like a bookmark/reading timer). The way I gift books to my friends is pretty simple.
   First, I think about all of my favorite books. I like to do so so I know I'm giving an awesome story to read, instead of one that's just average.
Credit
   Then I narrow down what types of books my friend in question likes, whether it's a fantasy, etc.
choosing a book book gif
Credit

   Finally, I pick out the top one/two for them, depending on if I'm giving them something else as well.
   Sometimes, I actually just wander into the book section of a store and sense that the books I've read just won't be appealing to the person I'm giving them to. That means I have to look at the books I haven't read, so I choose carefully based on the synopsis of the novel or if I've heard about it a lot.
Image result for that looks good gif
Credit
   The first process takes me a few minutes in my head, so I have books chosen out for my friends months in advance. If I have to choose a book I haven't read yet in stores, then it takes me about ten minutes.
   Do you gift books to your friends? How do you do so? Do have a special process? Tell me below!

Friday, August 25, 2017

DIY Pencil Case

In case your school hasn't started yet, and even if it has, I have a quick DIY that you can whip up in no time with a sewing machine. If you don't have a machine, it can take a bit longer, but it's worth it! The DIY is of a homemade pencil case, perfect for starting out the school year. Here's mine:
The fabric and zipper were from Walmart. Isn't the case adorable? I personally love the elephants (which come with a pink and yellow background as well).
Do you want to make one? Of course you do! Here are the instructions:
First, cut out four identical pieces from the fabric (two for lining inside, and the other two for the outside). Line up two pairs of pieces back-to-back, then stack one pair on top of the other so you'll have the elephants on the front and back of the case and on the inside.

The lining reveals that on the inside... there are more elephants :)!
Next, sew three consecutive sides (two short, one long), leaving one side open for the zipper.
 
Now comes the difficult part if you're sewing by hand. Flip the case inside out. Take two pieces (one lining, one covering) and sew on the zipper upside-down (it should be right side up when the case is flipped back again). You can sew the zipper on while the it is unzipped or zipped for now. I know this is not super clear as instructions go, so I recommend watching a video or asking someone for help if you have questions for sewing the zipper on.

 This is how it should look inverted with one side of the zipper sewed on.

Then, with the case still inverted, sew the other side of the zipper onto the other two pieces, but make sure it is unzipped! Or else you will be stuck with a pencil case that doesn't open and is inside out.
Flip the case back again when you're done.


That's it! With just fabric, a zipper, thread, a needle, and scissors, you can make a personalized pencil case to start off the school year! Are you interested in making a pencil case? Have you ever made one before? Tell me below!

Tuesday, August 22, 2017

My Polymer Clay Collection Part 2

The subject of this post lies in this box.
It may look like an ordinary box, but think not. Inside, there is a treasure. Namely...
Cupcakes. Lots and lots of polymer clay cupcakes. Some are my creation, some are based off pictures from online, and others are from tutorials. Again, I will do my best to mention which of the three the picture is of, but I may not be able to.
Anyways, the treasure in here will take a long time to explore, and will most probably leave you a bit hungry for some real cupcakes. However, in my opinion, it is worth it. You have been warned.

Flavor: Chocolate cupcake with vanilla frosting and chocolate chips. I think this was based off an Oreo cupcake I saw online.

Flavor: Lemon cupcake with vanilla icing and lemon zest. This may have been from a tutorial, but I'm not sure.


Flavor: Vanilla cupcake with vanilla frosting and rainbow sprinkles.

Flavor: Vanilla cupcake with vanilla buttercream and a candy rose.

Flavor: Red velvet with candy heart sprinkles.

Flavor: No clue. Probably mint with a tennis trophy and racket.

Flavor: Chocolate with purple icing and a candy flower. Instructions are in the Arts and Crafts section on this blog.

Flavor: A chocolate cupcake with vanilla frosting and a candy butterfly.

Flavors: Raspberry and strawberry for the lady on the left, and chocolate for the man on the right. Both have vanilla frosting. I made this from images online. Aren't they adorable?

Flavor: Red velvet cupcake with icing, and a cherry on top.

Flavor: Cookies and cream cupcake. Yum.

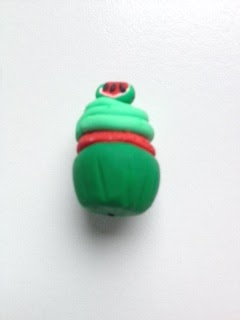
Flavor: Watermelon cupcake. This was from a tutorial online.

This caramel cupcake is inspired off a cupcake I read about in a book.

This one is my own design, with a chocolate base and mint frosting and sprinkles. There's a candy star on top.

Another one of my designs, with a tie-dye frosting and chocolate topper heart on a plain yellow base.

I designed a Santa cupcake with a red base and beard. Doesn't it look cute?

Another Christmas cupcake, gingerbread flavored with a fondant gift and tiny candy cane.


Here's a breakfast cupcake I made.

Flavor: Chocolate cupcake with pink icing and a mint leaf candy. I designed this one myself, too :).
This, my friends, is my treasure. If you'd like to see Part 1 of my collection, click here.
Which one is your favorite? Would you like to make some polymer clay cupcakes soon? Tell me below!

Saturday, August 19, 2017

A Food Week

My family has been doing a lot of baking recently, and I've been making lots of cakes and cupcakes for the past three weeks, all out of the mix. On Saturday, we made cinnamon rolls out of the package, but on Sunday morning, my sister started making butter cookies from a recipe in a book. I decided to join her by making some berry tarts.
I wasn't really sure how everything was going to turn out, because we never bake from scratch. Ever. However, the butter cookies were delicious!
I can't even believe how they turned out!
These were my blueberry-raspberry-blackberry tarts. They tasted awesome :).

My sister and I made a cake yesterday, too, from a mix, which turned out nicely as well.


Doesn't it look Christmas-y? I just need red sprinkles and green frosting. I want to try making a chocolate cake from scratch and see how that turns out, too!
I also assembled quesadillas at a friend's house (using a stove and everything, and they weren't even burnt!), and cooked some sandwiches. I think I'm definitely starting to branch out a bit more, no matter how basic the recipes are.

Are you a master chef in the kitchen? Or do you like to use easy recipes to cook? Tell me below!


Wednesday, August 16, 2017

My Polymer Clay Collection (Part 1)

Y'all know by now that I make charms, etc. out of polymer clay. Today, I thought it would be fun to browse around my collection a bit, so I've included photos of nearly all my polymer clay charms in a two-part series. I will be posting the other half of my collection later on.
Some of these are from tutorials, others are from google images I found online, and others are my own designs. I'm not going to post all of the links to tutorials and images because that would be a lot of links, and I don't remember all of the ones I used. I will try to state which sources the charms are based off of.

Let's jump right in!

From left to right: A blueberry, a strawberry that didn't turn out very well, a banana slice, and an orange slice. The last three fruit were made with the help of  various tutorials on how to do fruit canes.
More fruit.


These are my own creations of little MDBC book covers. 

A sparkly birthday cake.


Hot chocolate with marshmallows, fudge sauce, and caramel sauce. Yum! 

A burger with lettuce and tomatoes. The hole at the top was for an eyepin, but I took it out and used it for another project.


This pig was an idea from the Klutz Clay Charms kit, with a pig flying (as in the idiom). 


This candle was from a series of tutorials for 30-ish days until Christmas. Isn't the candle so cute? 

Yum, cannoli and pancakes for breakfast! The plate isn't polymer clay, it's from a teaset that we had. I saw the cannoli off a few images online. I doubt I used a tutorial for any of the items on this plate (not even the fruit).

A caramel apple, perfect for Halloween.

There's Harry Potter, fighting Lord Voldemort, who has currently lost an eyebrow. Oopsies. 

Two snowmen.

This is a fresh spring roll made from rice wrap that hasn't been fried. 

These are steamed dumplings.

A cinnamon roll.


Would you like s'more s'mores?
Actually, the bottom of this has a bit of the graham cracker missing. I think it cracked off too easily. I need to repair lots of these charms, and do something about the eyepin holes!

A macaron.  

Red velvet cookie with sprinkles.

A hot dog.

Here are some ice skates I made.

Anyone want their fortune told?


Here's Mickey and the gang, inspired off of Tsum Tsums. 

An elegant cake with a strawberry. Simple, but classic.


These are some of my first turtles. I have a link to the tutorial in the Arts and Crafts section on this blog from a previous post.

Here is my dragon! I also have the link to her tutorial I found in the Arts and Crafts section.
Orange is the new black for this tiger. For his link, just like the others', you can look in the Arts and Crafts section.


Which polymer clay figure is your favorite? Also, if you cannot find the link to any of these and you'd like me to provide it, then just comment below! I can also look into any requests anyone has for charms.
Keep reading!


Related Posts Plugin for WordPress, Blogger...